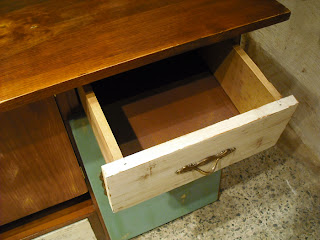
See the 'before' picture, below in the Making Of section: to that basic structure I have added some shelves and a couple of doors, adapted a huge drawer (for the table cloths and napkins); and built a whole section on the right handside with yet another reclaimed drawer (for the cutlery) and more shelves behind a door. Storage galore!
As I had to adapt my design to the former piece and all the doors would have different measures, I decided to turn this into an advantage and go for a mismatch look -kind of like the composition on a Mondrian picture, but with a Midcentury Modern look.
The whole piece, old and new, is made out of solid pine boards that I have stained in a dark hue. This makes the perfect frame for the colourful front: two of the doors are painted in light teal, the central one is stained in a sligthly lighter tone than the frame, and the drawers have an off-white front. All distressed, as per the customer's request, and then of course varnished and polished for protection and a soft, satin touch. A set of vintage brass handles ties it all together and completes the combo.
Measures: 150cm long, surface 50cm deep, body 36cm deep, 79cm high.


MAKING OF:
See here on the right the shelving unit in its former state.
Below, step by step, the building of all the different parts:
1- DRAWERS
Cutting the big drawer that would go below the central part of the future cabinet. The piece, once re-sized.
Staining the bottom boards of both drawers
Sanding and painting their fronts, then distressing.
Varnishing and fastening the handles (those nails looked cute, but I finally changed them for small brass screws, as the big, solid wood drawers were so heavy I feared the nails wouldn't hold!)
2- CABINET STRUCTURE
I started by pulling off several narrow slats that were nailed to some parts (not even the owner knew their former role, and they would get on the way to store the piles of dishes), and adapting the new shelves to the unsquared structure *rolling eyes*
All the new main pieces, cut and ready to be added!. Cutting the ledges to hold the shelves.
Sanding off the old, ugly varnish, to be able to stain it like the rest.
Here, staining shelves and slats -I didn't take pictures of all the rest of parts, but they got stained as well, of course.
Polishing, before securing the added shelves. The addition of the new section, and the new foot made of pieces of reclaimed pinewood.
Stainig the sides and adding the slats of reclaimed wood to fit the drawers into their new 'homes'. Finally, adding the back to the new section.
3- DOORS
The pineboards, dry fitted into their future places. Rounding the edges (it took a long time, but even if I had a router machine I would have done this one 'by hand', as the rustic finish suits this piece best!)
Mixing the paint to get that light teal colour that was so common in those vintage kitchen cabinets -I think I got it! Painting the front of the doors with it.
Distressing -stainig the central door,
Varnishing after distressing, polishing (not shown), and fastening the hinges.
Hanging the doors and, finally! nailing the handles. Done!


Qué chulo, me encanta!
ReplyDeleteMuchas gracias! :)
Delete